Setting the correct Node.js version is essential for ensuring your applications run smoothly and consistently across different development environments. If you work on multiple projects, you may find that each one requires a different version of Node.js. This is where nodenv becomes an invaluable tool. It allows you to install, manage, and switch between multiple Node.js versions with ease.
You can set a global version that serves as the default for your entire system, while also assigning a local version for individual projects that have specific requirements. In this guide, you’ll learn how to set both global and local Node.js versions with nodenv, understand how version selection works, and follow best practices to maintain a reliable and efficient development workflow.
Read More: How Do I Switch Between Node.js Versions Using nodenv?
What Is a Global Node.js Version in nodenv?
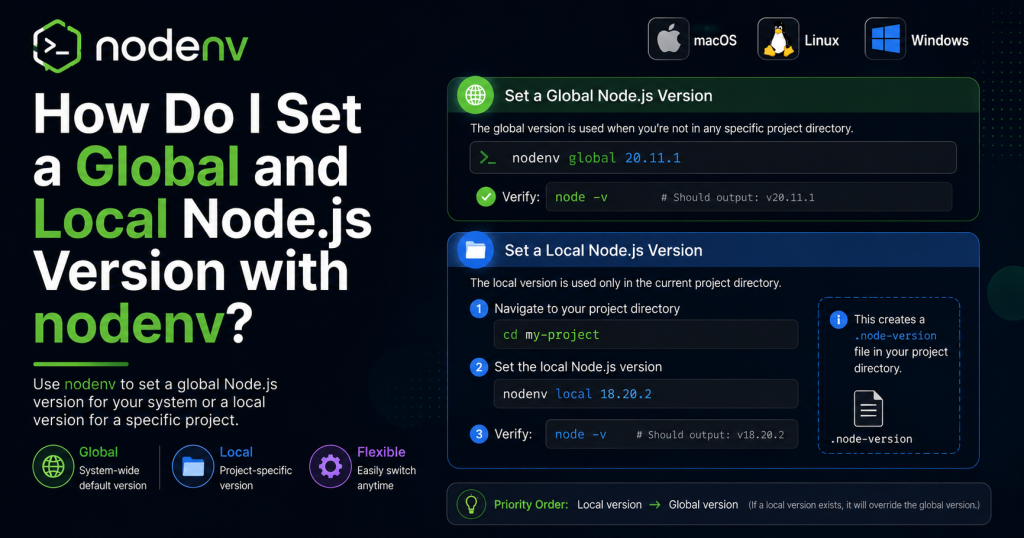
A global Node.js version is the default version that nodenv uses whenever you’re outside a project with its own Node.js configuration.
For example, if you use Node.js 22 for most of your work, you can set it as your global version. Every new terminal session will use that version unless a project specifies a different one.
This makes it easy to maintain a consistent development environment across your computer.
What Is a Local Node.js Version?
A local Node.js version is specific to a single project directory.
When you enter that project folder, nodenv automatically switches to the version defined for that project. Once you leave the directory, nodenv returns to the global version.
This is especially useful when:
- Maintaining legacy applications
- Working on multiple client projects
- Testing applications with different Node.js releases
- Collaborating with teams using fixed Node.js versions
The local version is stored inside a file named:
.node-versionThis file can be committed to Git so everyone working on the project uses the same Node.js version.
Check Installed Node.js Versions
Before setting a version, verify which versions are installed.
Run:
nodenv versionsExample output:
  18.20.4
* 20.19.0 (set by ~/.nodenv/version)
  22.10.0
The asterisk (*) shows the currently active version.
How to Set a Global Node.js Version
Use the following command:
nodenv global 22.10.0Replace 22.10.0 with the version you want.
Now verify it:
node -vOutput:
v22.10.0You can also verify the configuration:
nodenv versionExample:
22.10.0 (set by ~/.nodenv/version)The selected version is saved in:
~/.nodenv/versionEvery terminal session will use this version unless overridden.
How to Set a Local Node.js Version
Navigate to your project directory:
cd my-projectNow set the project’s Node.js version:
nodenv local 20.19.0nodenv creates a file:
.node-versionContents:
20.19.0Check the active version:
node -vOutput:
v20.19.0Only this project uses that version.
How nodenv Chooses Which Version to Use
nodenv follows a simple priority order:
- Shell version (if temporarily specified)
- Local project version
- Global version
- System Node.js (if configured)
For example:
Global:
22.10.0Project:
20.19.0When you’re inside the project:
node -vOutput:
v20.19.0Outside the project:
node -vOutput:
v22.10.0The switch happens automatically.
Verify Which Version Is Active
To see which version nodenv is currently using:
nodenv versionExample:
20.19.0 (set by /projects/app/.node-version)To locate the Node executable:
nodenv which nodeExample:
~/.nodenv/versions/20.19.0/bin/nodeRehash After Installing a New Version
Whenever you install a new Node.js version or global npm package, rebuild nodenv’s shims:
nodenv rehashThis updates the executable links so newly installed commands work correctly.
Switch Back to the Global Version
To remove the project’s local version:
rm .node-versionOr run:
nodenv local --unsetOnce removed, nodenv automatically falls back to the global version.
Change the Global Version Anytime
You can switch your default version whenever needed:
nodenv global 20.19.0Verify:
node -vOutput:
v20.19.0The change takes effect immediately in new shell sessions.
Share Node.js Versions with Your Team
The .node-version file should be committed to your Git repository.
Example:
project/
├── package.json
├── .node-version
└── src/
This ensures every developer uses the same Node.js version, reducing compatibility issues and making builds more reliable.
Common Problems and Solutions
Node Version Doesn’t Change
Run:
nodenv rehashThen restart your terminal.
nodenv Command Not Found
Ensure nodenv is installed correctly and added to your shell configuration.
Check:
echo $PATHYour PATH should include nodenv’s shims directory.
Wrong Version Is Still Active
Verify your current configuration:
nodenv versionIf another .node-version file exists in a parent directory, nodenv may use that version instead.
Node Isn’t Installed
Check installed versions:
nodenv versionsIf your desired version isn’t listed, install it first using the appropriate Node.js build plugin.
Best Practices for Using Global and Local Versions
For the best development experience:
- Use the latest stable Node.js version globally.
- Set a local version for every project.
- Commit the
.node-versionfile to version control. - Run
nodenv rehashafter installing new versions or global packages. - Keep Node.js versions updated when your applications support newer releases.
- Verify the active version before troubleshooting project issues.
Following these practices keeps your workflow predictable and minimizes version conflicts.
Conclusion
Setting a global and local Node.js version with nodenv is a simple yet powerful way to manage multiple development environments without conflicts. A global version provides a consistent default for your system, while local versions ensure each project uses the exact Node.js release it was built and tested with. This approach improves compatibility, simplifies collaboration, and reduces version-related issues across different applications. By using commands like nodenv global, nodenv local, nodenv version, and nodenv rehash, you can switch between Node.js versions effortlessly and keep your workflow organized. Whether you’re working on personal projects or collaborating with a team, nodenv makes Node.js version management efficient, reliable, and developer-friendly.